Diversity in Gaming: The Progress We’ve Made and the Work Ahead
source https://vivekgyan7.rf.gd/2025/10/21/diversity-in-gaming-the-progress-weve-made-and-the-work-ahead/
Hello! Welcome to CodeNest.
If you want to add free background remover tool on blogger website then this post is just for you.

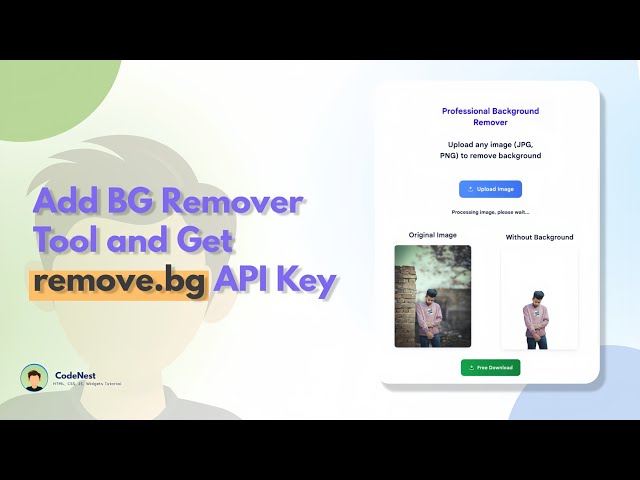
Removing image backgrounds has never been easier! With this simple and professional Online Background Remover Tool, you can easily remove the background from any image in just seconds.
A background remover tool is a web-based utility that allows users to automatically remove the background from an image, usually leaving the main subject intact. It’s especially useful for e-commerce product images, profile pictures, social media content, or any project where you want a clean and professional look without any distractions in the background.
This tool uses the powerful Remove.bg API behind the scenes. Remove.bg is an advanced AI service that detects the subject of your image and removes the background automatically, with high accuracy.
You can see the demo⤵
We’ve integrated remove.bg API to deliver fast, accurate results. You don’t need any software or skills — everything happens automatically in your browser!
Step 1: First of all Login to your Blogger Dashboard.
Step 2: On Blogger Dashboard, click Pages.
Step 3: Either create a new page by clicking on icon or click on the existing page to add codes there.
Step 4: Switch to HTML view.
Step 5: Paste the following codes in it
<html lang="en"> <head> <meta charset="UTF-8" /> <meta name="viewport" content="width=device-width, initial-scale=1.0"/> <title>BGXpert - Background Remover</title> <style> #mobile-menu,mobile-menu,.main-wrapper, mobile-menu,.breadcrumbs,.postTitle, .itm,footer, header,.headIn,.navIn,.navbar,.ntfC,.ancrCn{display:none}#qEdit.blog-admin.qEdit,.brdCmb,#backTop.toTopB.nBtm.vsbl,.mnBr,#notif-widget.section,.blogMn,.wvC,.adB,#LinkList001,.ancrC{display:none;} #link a{text-decoration:none} /*body { margin: 0; font-family: 'Segoe UI', sans-serif; background: #f1f5f9; color: #111827; }*/ main { padding: 30px 20px; max-width: 1000px; margin: auto; text-align: center; } h2 { margin-bottom: 20px; font-size: 22px; } input[type="file"] { display: none; } .upload-btn { background: linear-gradient(to right, #3b82f6, #2563eb); color: white; padding: 12px 24px; font-weight: bold; font-size: 16px; border: none; border-radius: 12px; cursor: pointer; margin: 10px; transition: all 0.3s ease; display: inline-flex; align-items: center; gap: 10px; } .upload-btn:hover { opacity: 0.9; transform: scale(1.03); } #loading { display: none; margin-top: 20px; font-weight: bold; } .image-grid { display: flex; flex-wrap: wrap; justify-content: center; gap: 30px; margin-top: 30px; } .image-box { flex: 1 1 300px; text-align: center; } .image-box img { width: 100%; max-width: 300px; border-radius: 10px; box-shadow: 0 4px 16px rgba(0,0,0,0.1); background-repeat: no-repeat; background-size: cover; background-position: center; } .download-btn { display: inline-flex; align-items: center; justify-content: center; gap: 8px; margin: 20px auto 0; padding: 12px 24px; background: linear-gradient(to right, #16a34a, #15803d); color: #fff; border-radius: 10px; text-decoration: none; font-size: 15px; font-weight: bold; text-align: center; } .download-container { text-align: center; } .download-btn:hover { opacity: 0.9; } /*footer { text-align: center; padding: 20px; background: #111827; color: #fff; margin-top: 50px; }*/ @media (max-width: 768px) { .image-grid { flex-direction: column; align-items: center; } } .btn-icon { width: 18px; height: 18px; } </style> </head> <body> <main> <h2><span style="color: #2b00fe; font-size: x-large;">Professional Background Remover</span></h2> <h2>Upload any image (JPG, PNG) to remove background</h2> <label class="upload-btn" for="fileInput"> <!-- Upload SVG --> <svg class="btn-icon" fill="none" stroke="currentColor" stroke-width="2" viewBox="0 0 24 24"> <path stroke-linecap="round" stroke-linejoin="round" d="M4 16v1a2 2 0 002 2h12a2 2 0 002-2v-1M12 12V4m0 0L8 8m4-4l4 4"/> </svg> Upload Image </label> <input type="file" id="fileInput" accept="image/*"> <div id="loading">Processing image, please wait...</div> <div class="image-grid" id="result"></div> </main> <footer> <p>© 2025 BGXpert - All Rights Reserved</p> </footer> <script> const fileInput = document.getElementById('fileInput'); const loading = document.getElementById('loading'); const result = document.getElementById('result'); const API_KEY = 'YOUR_REMOVE_BG_API_KEY'; // Replace with your own fileInput.addEventListener('change', async () => { const file = fileInput.files[0]; if (!file) return; result.innerHTML = ''; loading.style.display = 'block'; const originalImgURL = URL.createObjectURL(file); const formData = new FormData(); formData.append('image_file', file); formData.append('size', 'auto'); const response = await fetch('https://api.remove.bg/v1.0/removebg', { method: 'POST', headers: { 'X-Api-Key': API_KEY }, body: formData }); const blob = await response.blob(); loading.style.display = 'none'; if (blob.type.startsWith('image')) { const removedImgURL = URL.createObjectURL(blob); result.innerHTML = ` <div class="image-box"> <h3>Original Image</h3> <img src="${originalImgURL}" alt="Original" /> </div> <div class="image-box"> <h3>Without Background</h3> <img src="${removedImgURL}" alt="No Background" /> </enter><div class="download-container"> <a href="${removedImgURL}" download="no-bg.png" class="download-btn"> <!-- Download SVG --> <svg class="btn-icon" fill="none" stroke="currentColor" stroke-width="2" viewBox="0 0 24 24"> <path stroke-linecap="round" stroke-linejoin="round" d="M4 16v1a2 2 0 002 2h12a2 2 0 002-2v-1M12 12V4m0 8l-4-4m4 4l4-4" /> </svg> Free Download </a> </div> </div></center> `; } else { result.innerHTML = `<p style="color:red;">Error: Background removal failed.</p>`; } }); </script> </body> </html>
Step 6: Go to remove.bg
Step 7: Sign up and get your API key.
Step 8: Replace this line in the code.
const API_KEY = 'YOUR_REMOVE_BG_API_KEY'; // Replace with your own const API_KEY = 'pPrZrbWLgKKg8LgupBksLkt4'; // Replace with your own
Step 9: Save or Publish
That's done!

This tool makes background removal super easy and fast. Just upload an image, and download the transparent version in seconds no editing skills needed.
Perfect for blogs, websites, and personal use. Add it to your site in minutes and let your users enjoy it for free!
Chat Max All 💬 : https://chat-max-all.blogspot.com
If you are facing any problem, don't hesitate.
#vivekgyan7 #vivekgyan70
CSS stands for Cascading Style Sheets. It’s a language used to style HTML elements. With CSS, you can change colors, fonts, layouts, spacing, and much more to make your website visually appealing.
There are three ways to use CSS:
CSS is written directly inside an HTML tag using the style attribute.
<h1 style="color: blue; font-size: 30px;">This is Inline CSS</h1>
CSS is written in a separate file (with a .css extension) and linked to your HTML file.
<head>
<link rel="stylesheet" href="styles.css">
</head>
CSS File (styles.css):
body {
background-color: #f9f9f9;
font-family: Arial, sans-serif;
}
h1 {
color: purple;
text-align: center;
}
CSS is written inside a <style> tag in the <head> section of your HTML document.
<head>
<style>
body {
background-color: #f0f8ff;
}
h1 {
color: green;
text-align: center;
}
</style>
</head>
Here are some important CSS properties to get started:
You can change the text and background colors using CSS.
h1 {
color: red; /* Text color */
}
body {
background-color: #e0f7fa; /* Background color */
}
CSS allows you to change the font, size, and alignment of text.
p {
font-size: 18px;
font-family: 'Georgia', serif;
text-align: justify;
}
You can control the spacing around and inside elements.
div {
margin: 20px; /* Space outside the element */
padding: 10px; /* Space inside the element */
border: 1px solid #ccc;
}
Add borders to elements to make them stand out.
img {
border: 2px solid black;
border-radius: 10px;
}
Here’s how you can create a basic webpage with CSS:
<!DOCTYPE html>
<html lang="en">
<head>
<meta charset="UTF-8">
<meta name="viewport" content="width=device-width, initial-scale=1.0">
<title>Advanced CSS Page</title>
<style>
/* Global Styles */
* {
margin: 0;
padding: 0;
box-sizing: border-box;
}
/* Header */
header {
background: linear-gradient(90deg, #4caf50, #388e3c);
color: white;
text-align: center;
padding: 20px;
font-size: 1.5rem;
font-weight: bold;
box-shadow: 0 4px 6px rgba(0, 0, 0, 0.1);
}
/* Main Content */
.container {
max-width: 900px;
margin: 40px auto;
padding: 20px;
background: white;
border-radius: 10px;
box-shadow: 0 4px 8px rgba(0, 0, 0, 0.1);
}
h2 {
color: #4caf50;
margin-bottom: 10px;
}
p {
font-size: 18px;
text-align: justify;
margin-bottom: 15px;
}
/* Image Styling */
img {
width: 100%;
max-width: 400px;
display: block;
margin: 20px auto;
border: 3px solid #4caf50;
border-radius: 10px;
box-shadow: 0 4px 6px rgba(0, 0, 0, 0.1);
}
/* Footer */
footer {
text-align: center;
padding: 15px;
background: #ddd;
font-size: 1rem;
font-weight: bold;
margin-top: 30px;
}
</style>
</head>
<body>
<header>
Welcome to Advanced CSS Page
</header>
<div class="container">
<h2>About This Page</h2>
<p>
This page demonstrates advanced CSS styling techniques with a clean and modern UI. The header uses a gradient background,
the main content has a card-like layout, and images have stylish borders and shadows.
</p>
<h2>Styled Image</h2>
<img src="https://via.placeholder.com/400" alt="Sample Image">
</div>
<footer>
© 2025 Your Website | All Rights Reserved
</footer>
</body>
</html>
This is Level 3 For Beginner I will Make level 4 Soon On CSS Standard introduction .


Adobe Photoshop 7.0 is the updated version of Adobe Photoshop 7 that is published by Adobe Inc, as a raster graphics editor. It is launched with multiple new improvements i.e. removing errors, fixing of bugs, and so on. The inclusion of new features to the awesome update helps the users to recover damaged or missing parts of the photos.
Adobe Photoshop 7.0 is the last version in the series, and Photoshop started a new series of Photoshop CC. It is compatible with all Windows operating systems including Windows 7, Windows 10, Windows 11, and Windows Vista, but doesn’t support multiple cloud storage services, so there is insufficient help to backup, share, and collaborate, as compared to the latest Photoshop releases.
You will find a great list of new features for a fast and convenient photo editing process. The software with enhanced performance offers a smooth editing process for your photos and videos on the big screen.
Enjoy a more simplified file management with the addition of File Browser. No need to open multiple windows, or switch to a third-party application, simply use the feature and quickly browse, organize, and preview your images. A great addition, specifically managing a large file, it will easily streamline your workflow, and save your time.
The software empowers graphic designers while offering multiple quick and efficient search functionalities. It helps the designers to search their required content reliably and save their time. Moreover, the addition of the Batch Rename feature is available for facilitating the of renaming multiple photos within a folder.
It is the best addition to the update, as it allows removing any type of elements, blemishes, or imperfections from your photos. You can get rid of entire distractions from your image while blending the pixels and erasing unwanted elements to get awesome results.
The layer-based workflow offers multiple innovative capabilities for creating impressive visual effects. You can organize and edit your images in a non-destructive style and make changes in required areas only. You have the option of applying different effects including shadows, bevels, and drop shadows to your selected layers, and get 100% results.
No need to depend on old styles of color fixing such as Auto Levels or Auto Contrast. Get 100% accurate color adjustment without any manual tweaking. A single click will give your image optimal color balance using an enhanced algorithm.
The seamless removal and relocation of the selected parts of your photos is possible through the Patch Tool. Blend and merge the stuff for unleash creativity with more controllable and flexible tool. No doubt, the best option for professional designers and retouch your photos finely.
The exporting of high-resolution images to the integrated format with Viewpoint’s technology is possible with the new addition of ZoomView technology. So you have the option to make your content easily zoomable for online users and make it a more interactive viewing experience.
If you face any problem then join our Tech Ankur Group
Copyright:
©Tech Ankur
🌍 Website: https://vivekgyan7.rf.gd
🎥 YouTube: youtube.com/c/VivekGYAN70
📸 Instagram: instagram.com/vivekgyan70
📘 Facebook Profile: facebook.com/vivekgyan7
📘 Facebook Page: facebook.com/vivekgyan70
🐦 Twitter (X): twitter.com/vivekgyan70
💼 LinkedIn: linkedin.com/in/vivekgyan70
🎭 Threads: threads.net/@vivekgyan70
📌 Pinterest: pinterest.com/vivekgyan7
📢 Telegram Channel: t.me/Vivekgyan7
💬 Telegram Group: t.me/vivekgyan70
📱 TikTok: tiktok.com/@vivekgyan70
📝 Blog: vivekgyan7.blogspot.com
👾 Reddit: reddit.com/user/vivekgyan7
#vivekgyan7 #vivekgyan70 #VivekGYAN7 #TechEducation #LearnToCode #AI #WebDevelopment #Programming #DataScience #MachineLearning #Python #JavaScript #HTML #CSS #FullStackDeveloper #CloudComputing #CyberSecurity #DevOps #MobileAppDevelopment #Freelancing #DigitalMarketing #SoftwareEngineering #ArtificialIntelligence #Blockchain #Automation #Ecommerce #UIUX #Startups #OnlineLearning #FutureOfWork #EdTech #Technology #Innovation #Coding #CodeNewbie #CodingCommunity #SelfLearning #TechTrends #OpenSource #RemoteWork #TechJobs
Welcome to Vivek GYAN 7.0 - Tools — your ultimate platform for powerful tools and fun apps! 🛠️ Explore productivity boosters, creative utilities, and entertainment apps that are simple, free, and reliable. From calculators 🧮 to AI tools 🤖, Vivek GYAN 7.0 - Tools is here to make your digital journey smooth and exciting. 🚀
Vivek GYAN 7.0 - Tools complies with all advertising policies, ensuring a safe and transparent experience for users. Learn more about:
AdMob Privacy Policy 📄 | Google AdSense Policy 🖥️ | Ads Manager Policy 📊 | Google Privacy Policy 🌐© 2025 Vivek GYAN 7.0 - Tools . All Rights Reserved. Powered by Blogger 🌐
When turned on automatically changes
the theme color on reload.
When turned on automatically changes
the theme color every 5 sec.